
More cross-border sellers are moving their stores off Shopify. Some want lower costs. Some need local support. Some sell products that need special payment options. Others want to try AI-native store tools. Migration is the part sellers worry about most. Common questions include:
- Will I lose my store data?
- Will my product SKUs get mixed up?
- Will my orders stop working?
- Will my domain hurt my SEO?
- Will my search rankings drop to zero?
This guide walks through the full process for a Shopify to Shoplazza migration. It covers what to check before you start, how to use the one-click migration plugin, how to connect your Shopify account, what to check after migration, and answers to common questions.
Is it possible to move off Shopify to another platform while keeping my current store active?
Yes. With a proper migration method and a clear data checklist, you can keep your current store running through most of the process. The only real downtime happens during domain switching and redirect setup. Even that usually takes minutes, not hours.
This is a real question that comes up in Reddit — someone asked whether there's any way to move their store off Shopify to a different platform while keeping the exact same design, without any downtime.
The answer they got was blunt: you'd need to hire a web developer to rebuild the entire site from scratch, and even then there was no guarantee you were in the clear, since a Shopify theme is licensed to that specific store, not to the merchant personally, so copying the design elsewhere carries a real copyright risk.
That answer is 2 years old. Back then, migration meant hiring someone who understood both the tech side and the store setup side. Platforms have since built purpose-made migration tools to make switching easier. Shoplazza's one-click store migration plugin is one of them:
- You don't need any development skills. You connect your Shopify store, pick the data you want to move (products, orders, customers, blog posts), and the plugin transfers it step by step. Your new storefront is built fresh on the new platform. It's not copied from your old theme, so there's no copyright overlap to worry about.
What should you check before you migrate?
Before you start, think through your data, your Shopify plan limits, and what needs to be ready ahead of time. This step saves you rework later. There are a few online store platform migration considerations worth checking early, especially your current plan tier and what data it lets you export.
Data that the one-click migration plugin moves
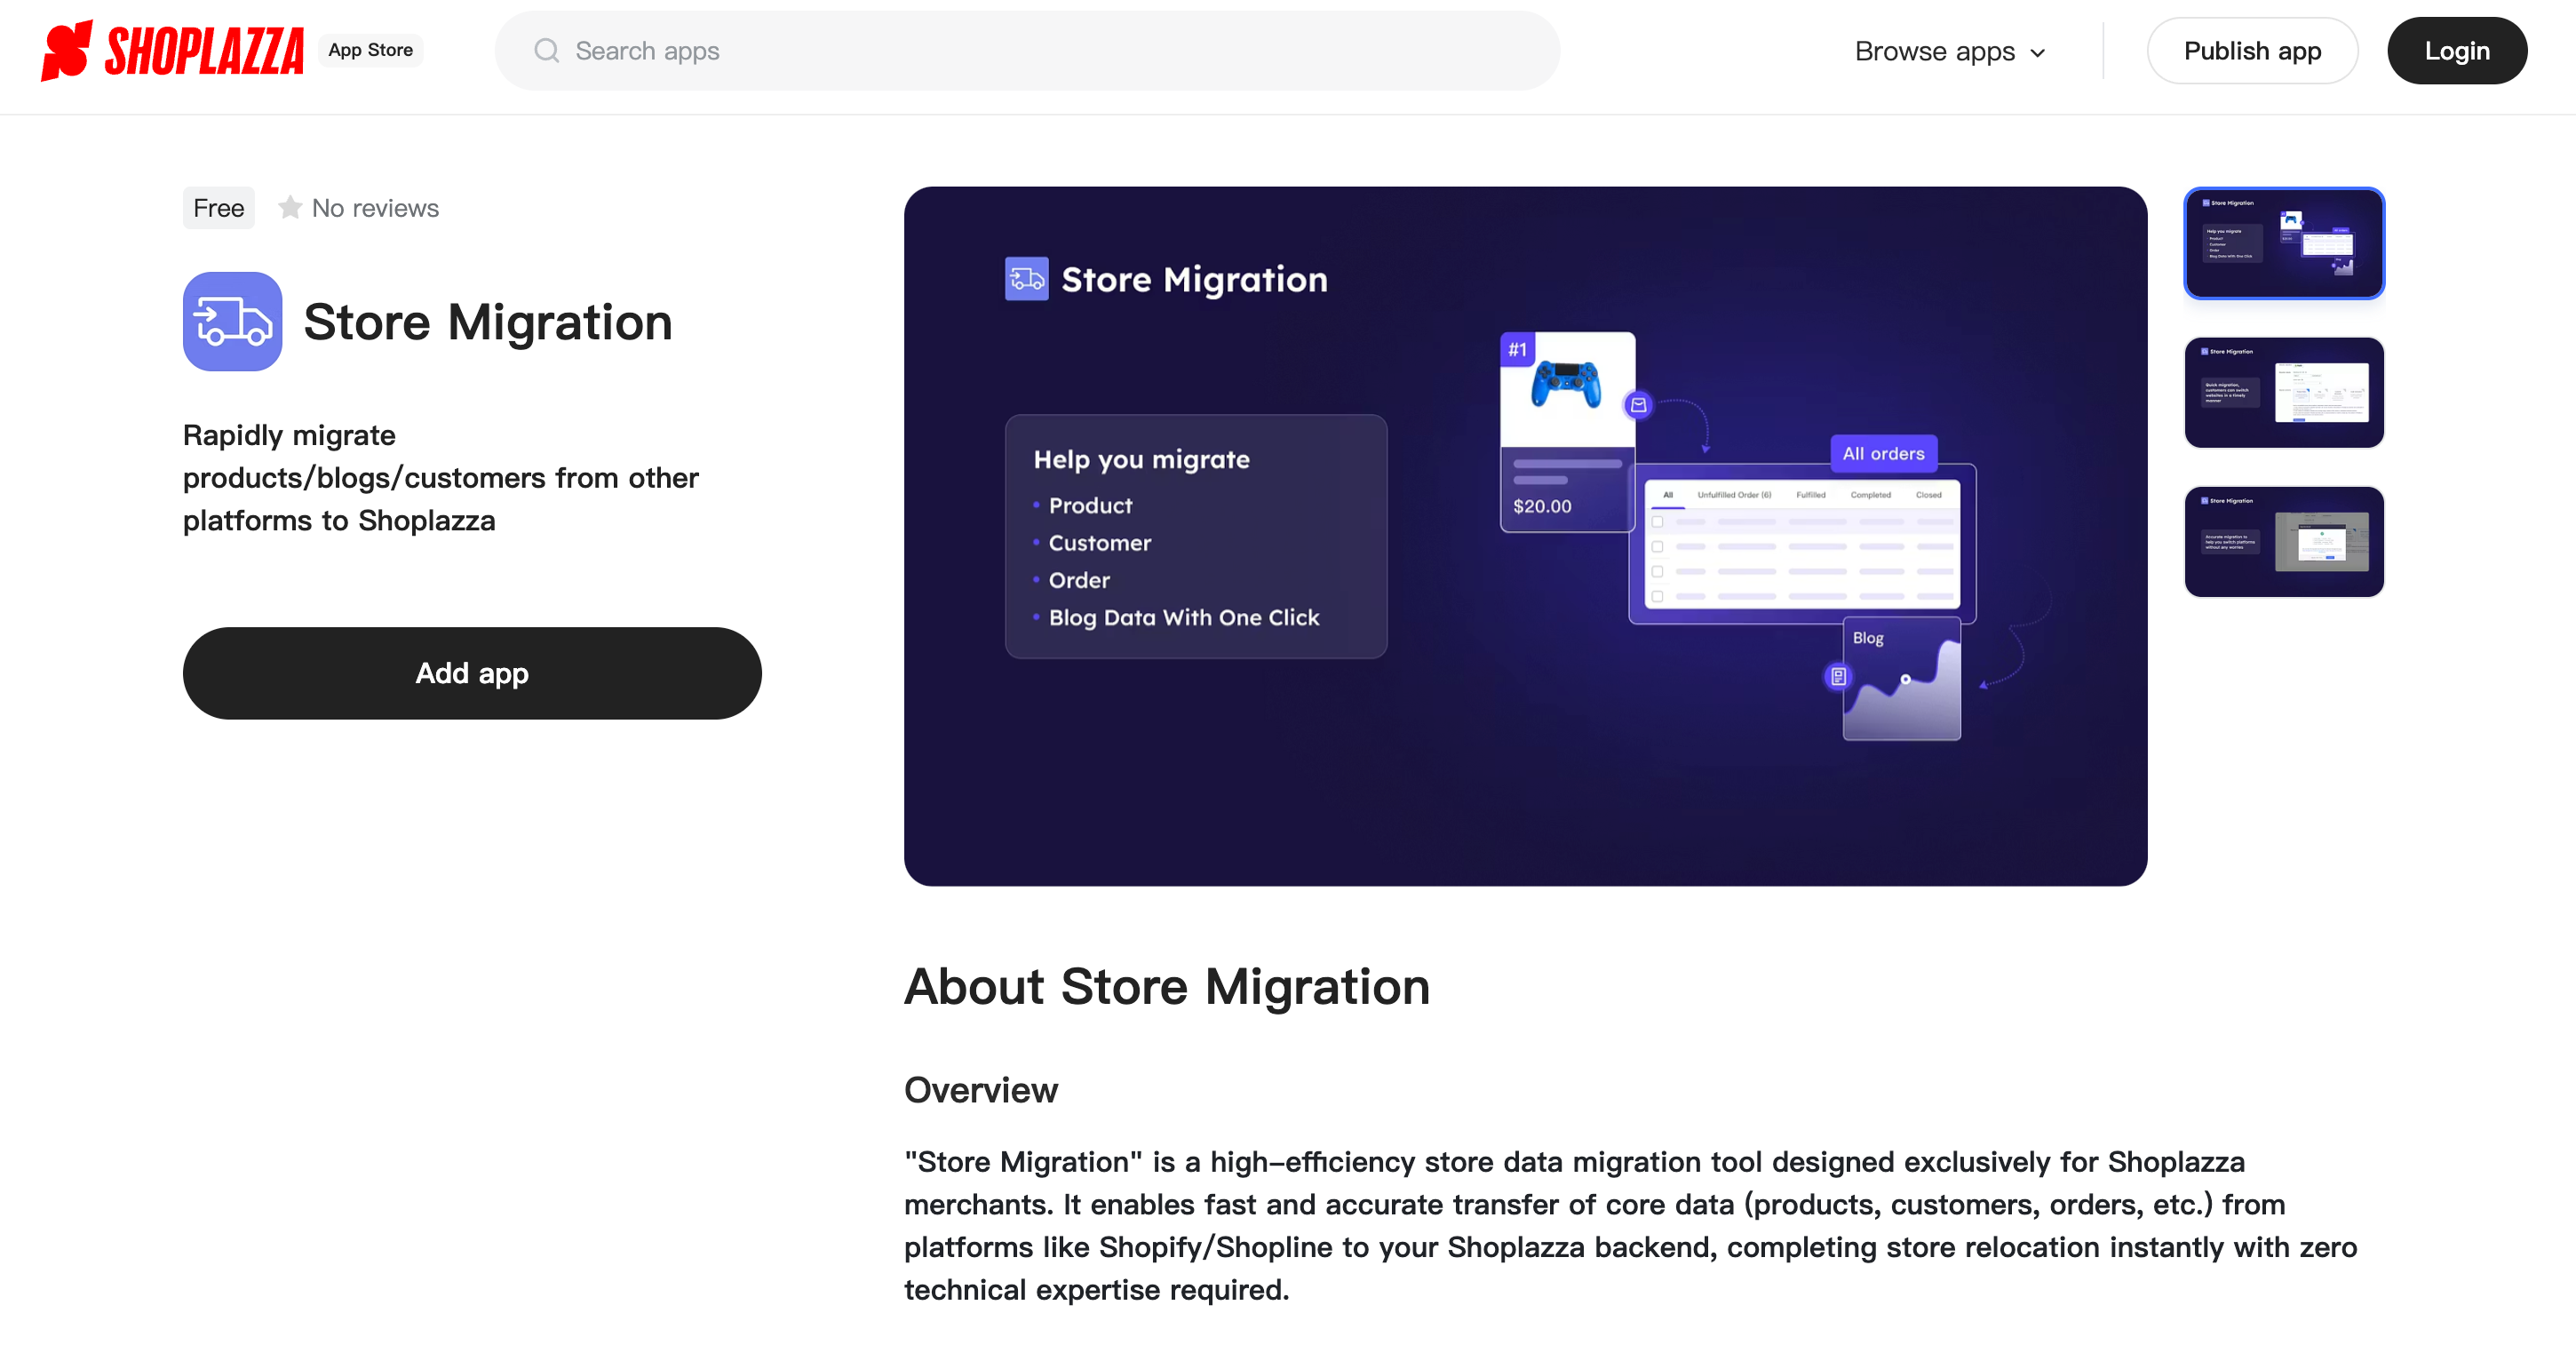
Shoplazza's official one-click store migration plugin can move these types of data from Shopify:
- Product data: titles, descriptions, images, SKUs, prices, stock, and variants
- Customer data: names, emails, addresses, and phone numbers (limits apply, see below)
- Order data: your order history and the products tied to each order
- Blog content: blog posts and categories
- Discount codes: your promo rules
Shopify Basic plan limit customer data migration
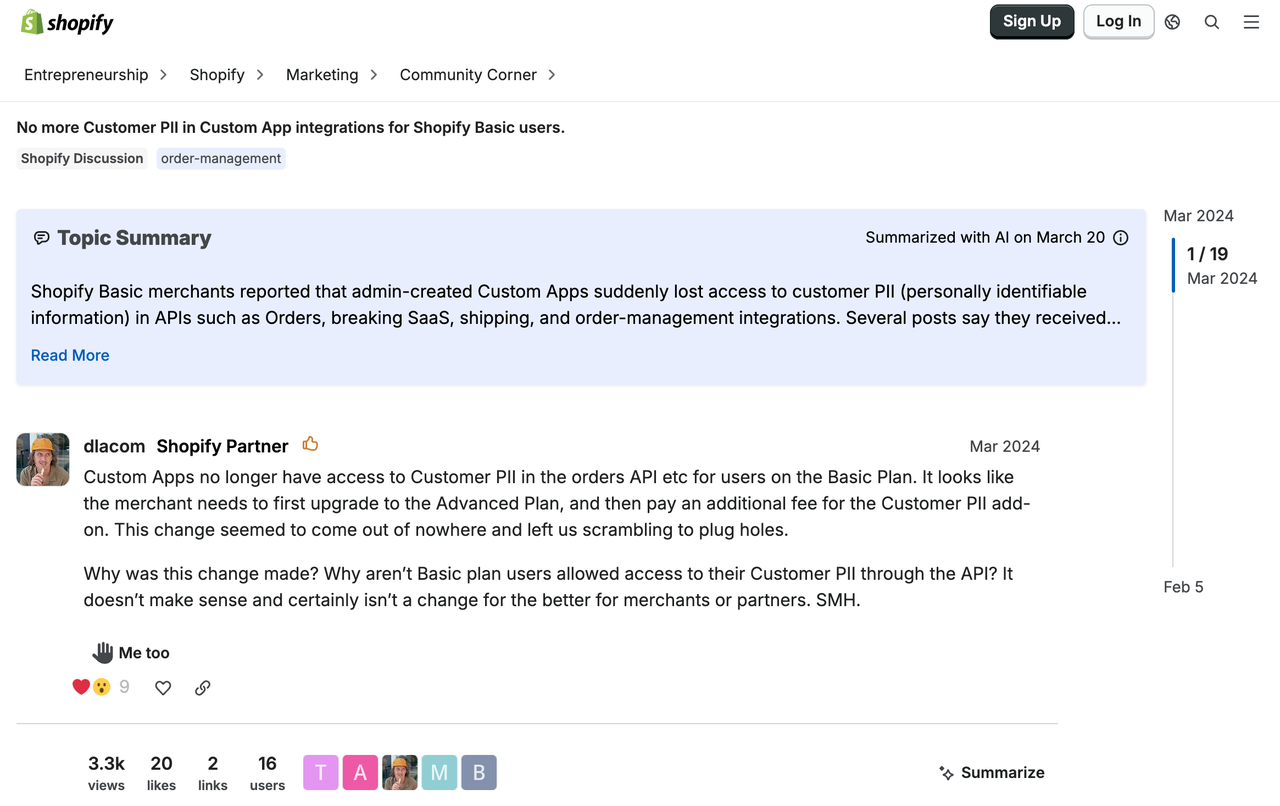
This isn't a Shoplazza limit. It comes from Shopify's own data policy. Since 2024, Shopify has restricted how much customer data a custom app can pull on the Basic plan. Fields like name, address, phone, and email are no longer returned through the Admin API. Shopify's developer community has discussed this change, and confirmed you need to upgrade to Shopify Grow or higher to get full access to these fields through the REST API again.
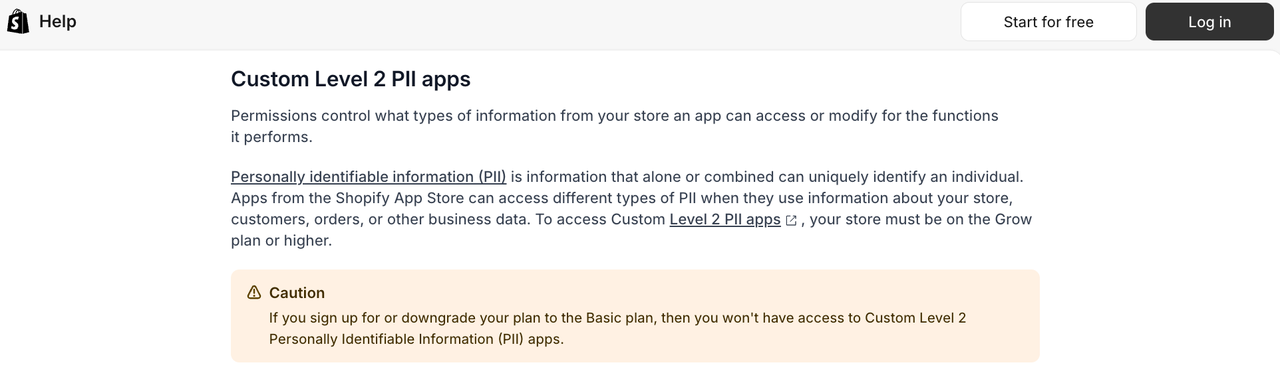
This isn't just a 2024 issue either. Shopify's help center still states that stores on, or downgraded to, the Basic plan can't access Custom Level 2 PII apps, which cover the fields above.
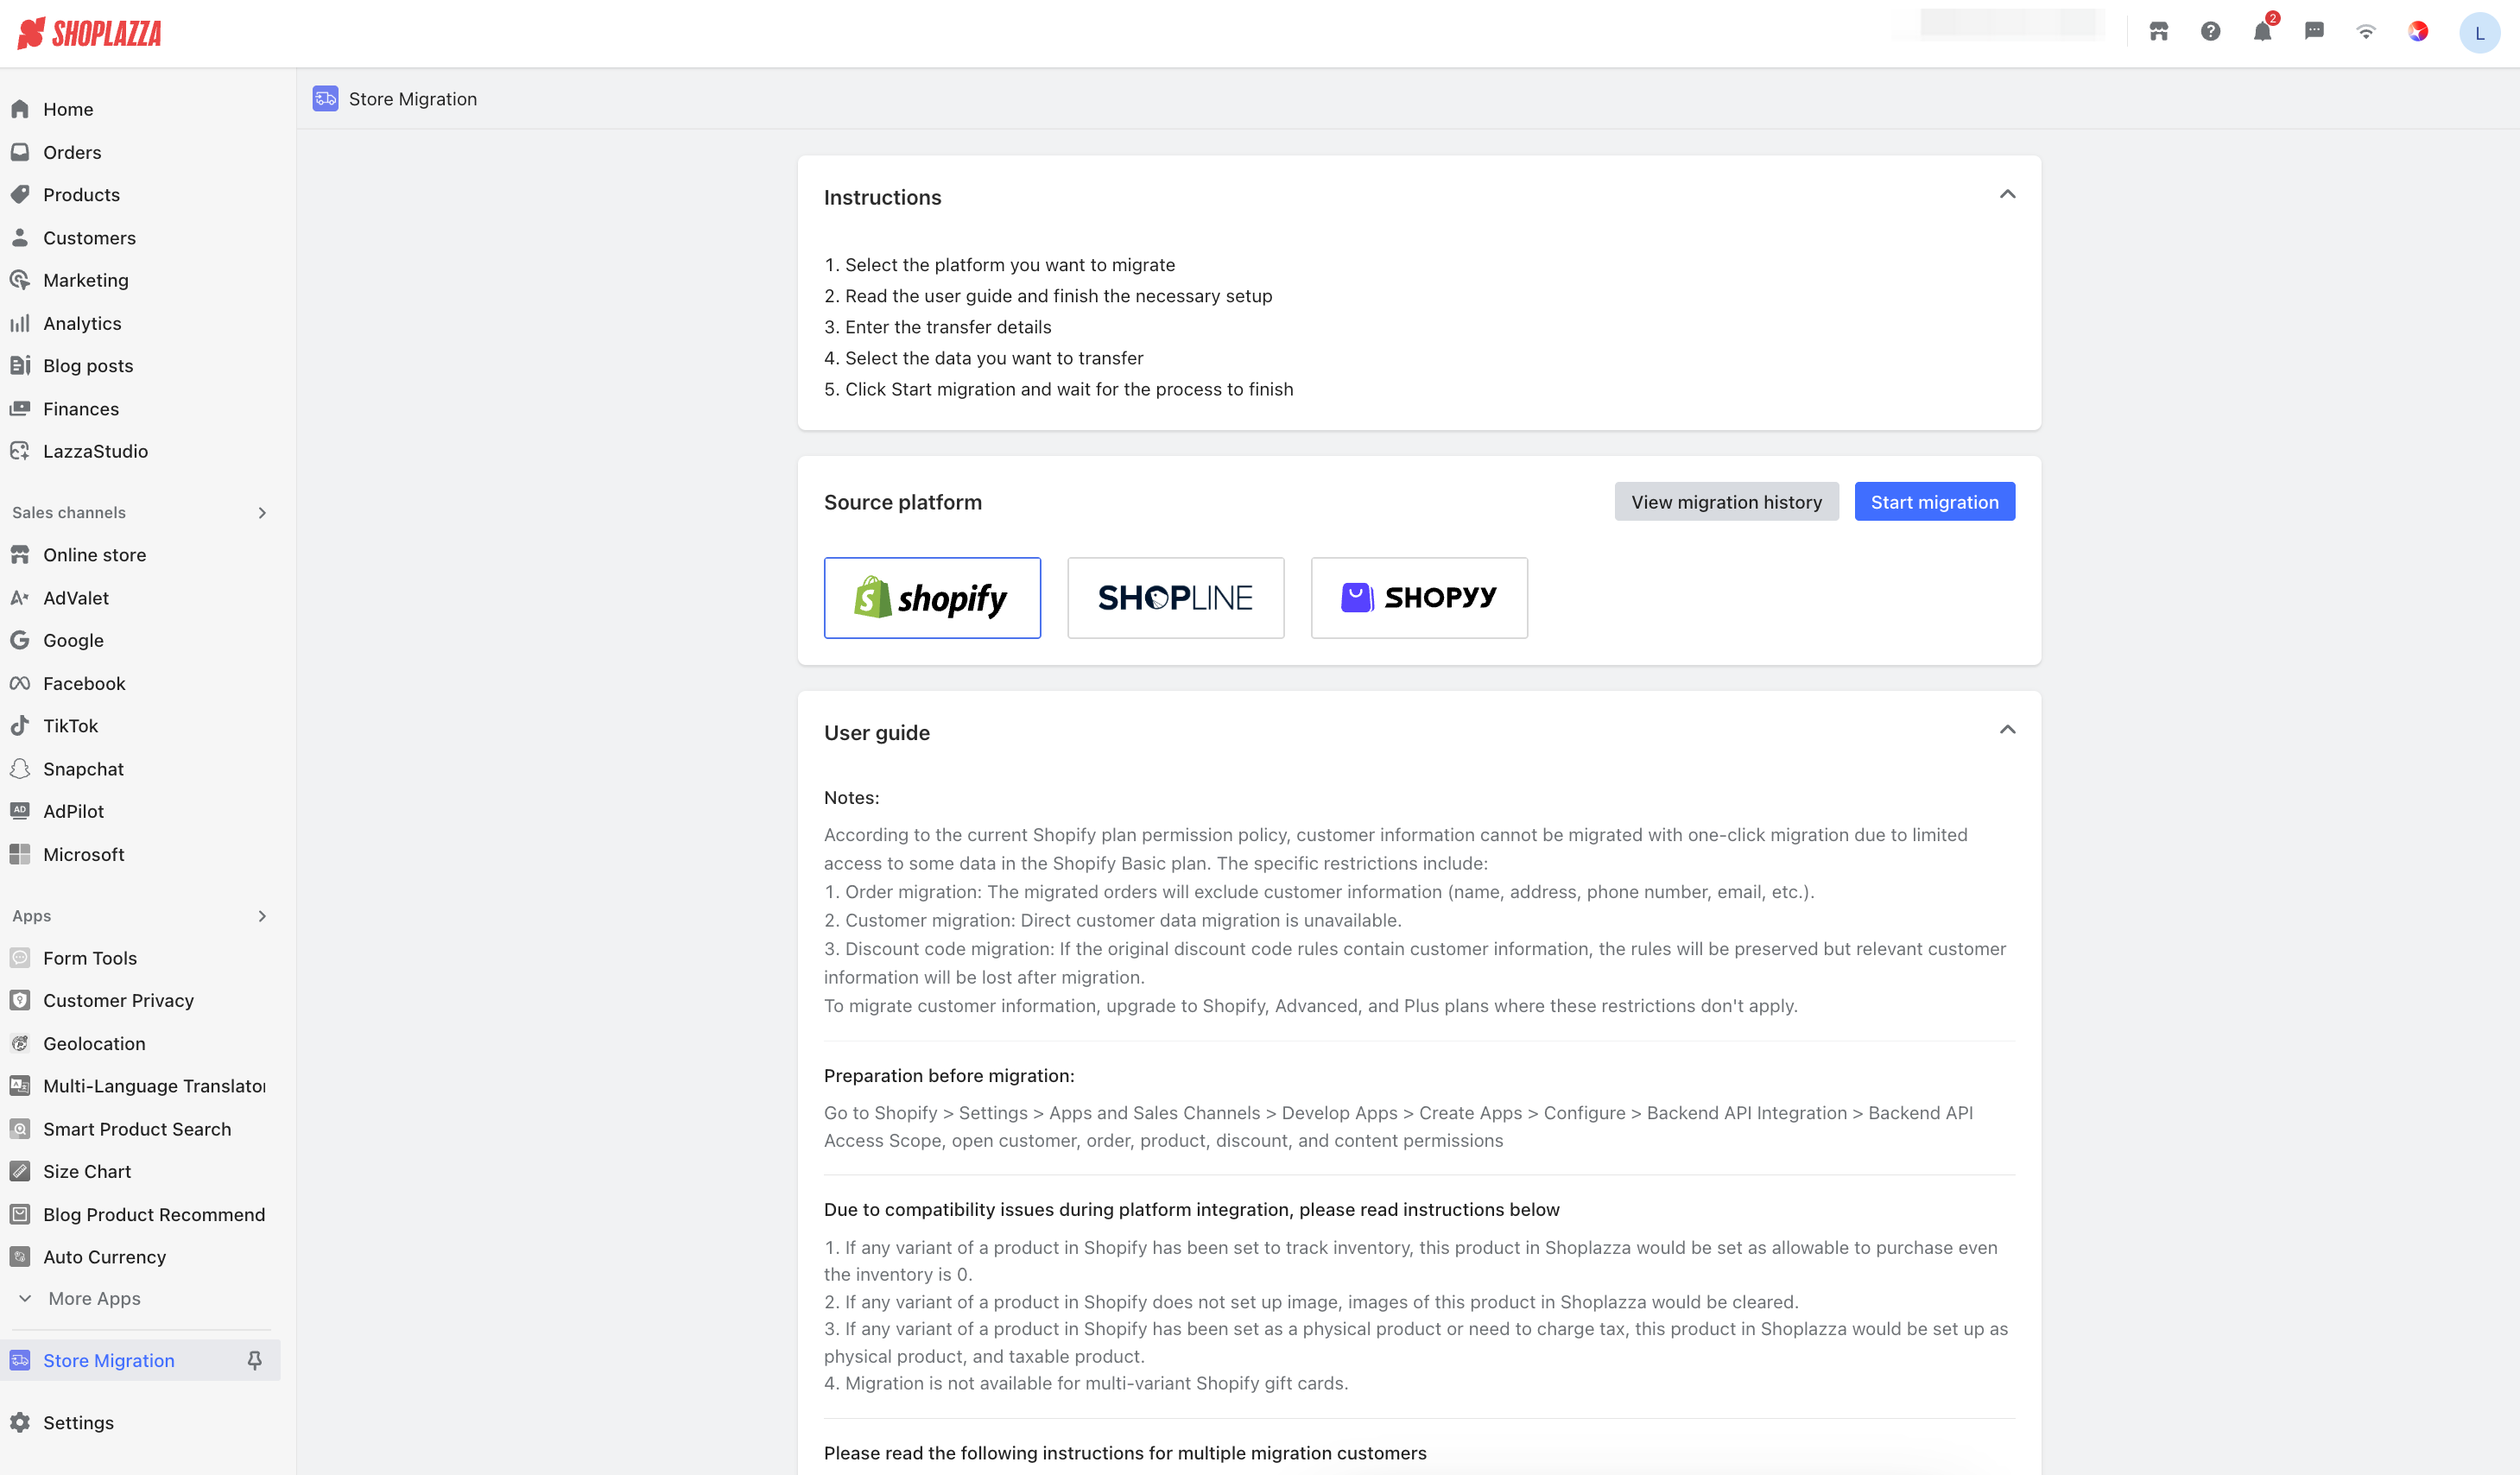
For your migration, this means orders moved through the plugin will be missing customer name, address, and phone if you're still on the Basic plan. If a discount code is tied to customer info, the rule itself will transfer, but the customer info won't. To bring over full customer data, you can either upgrade your Shopify plan to unlock PII access, or skip automation and export a customer CSV from Shopify, then import it manually through Shoplazza's customer import tool.
Pre-migration checklist
- Make sure your Shopify store is running normally and you can log in
- Check your Shopify plan tier and whether it limits customer data access
- Export a full backup of your product and customer data from Shopify (CSV format)
- Set up your Shoplazza account and finish basic store setup
- Pick a migration window, ideally during low-traffic hours
How do you migrate from Shopify to Shoplazza, step by step?
Once your prep work is done, there are three main steps: install the plugin, connect your Shopify account, and run the migration. None of it requires writing code.
Step 1: Install the store migration plugin
- Log into your Shoplazza admin panel. Click Apps in the left menu, then App Store. You can also find the app store from the home page navigation.
- Search for "Store Migration" in the app store and find the official migration plugin.
- Click Add app, then Install app.
- Open the plugin and click the Shopify icon. You'll be asked for your store URL and store key.
Next, you'll need to get these two pieces of info from your Shopify account.
Step 2: Get your Shopify authorization details
Get your store URL
- Log into your Shopify admin.
- Copy the store URL from your browser's address bar. It usually looks like
https://admin.shopify.com/store/developorhttps://develop.myshopify.com.
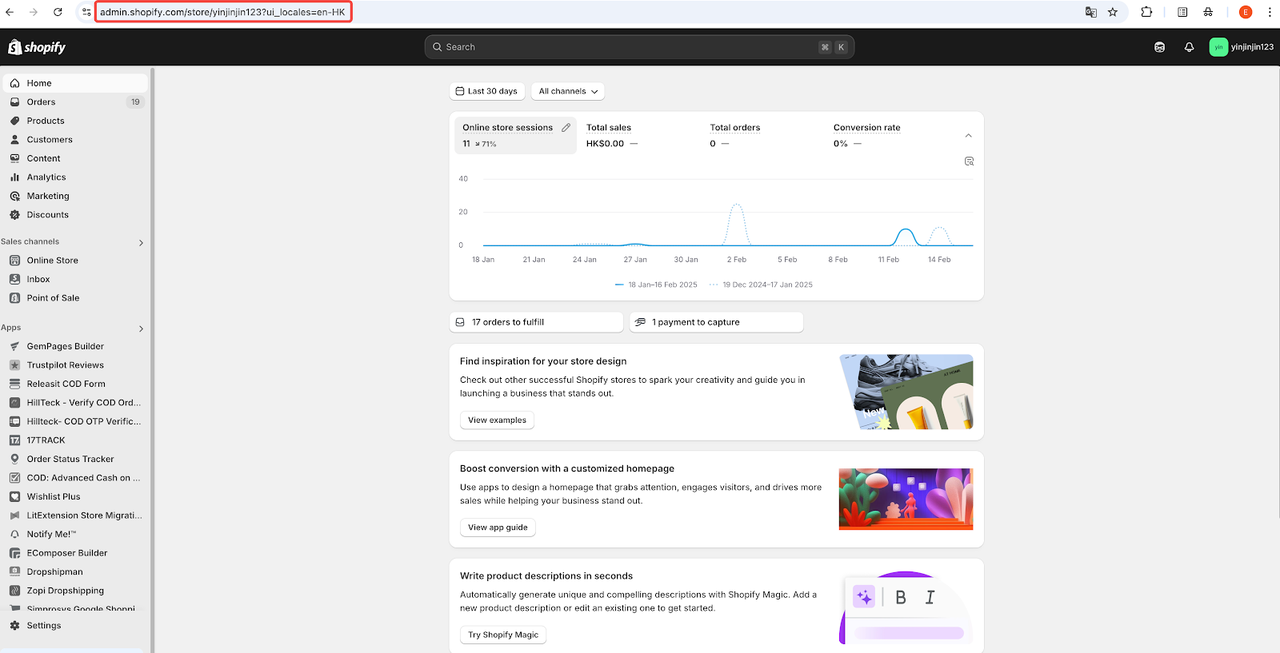
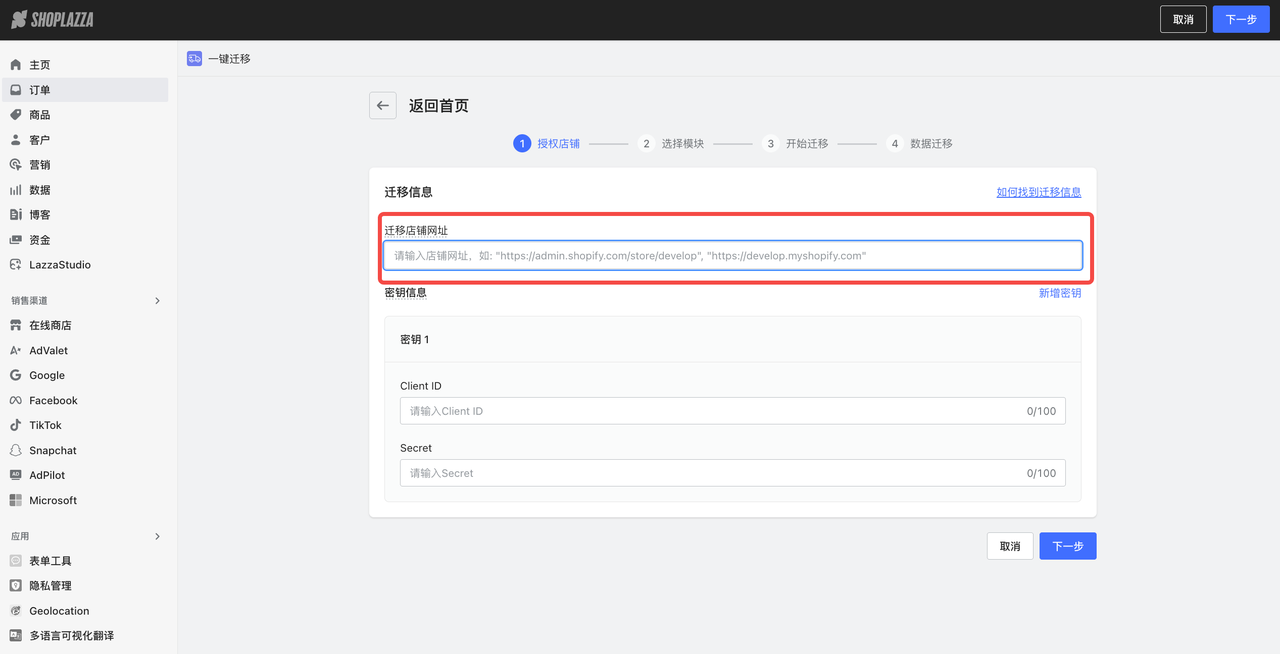
Create a Shopify Developer App
To let Shoplazza read your Shopify data, you need to create a Developer App in Shopify. This gives you a Client ID and Client Secret:
- In your Shopify admin, click Settings in the bottom left.
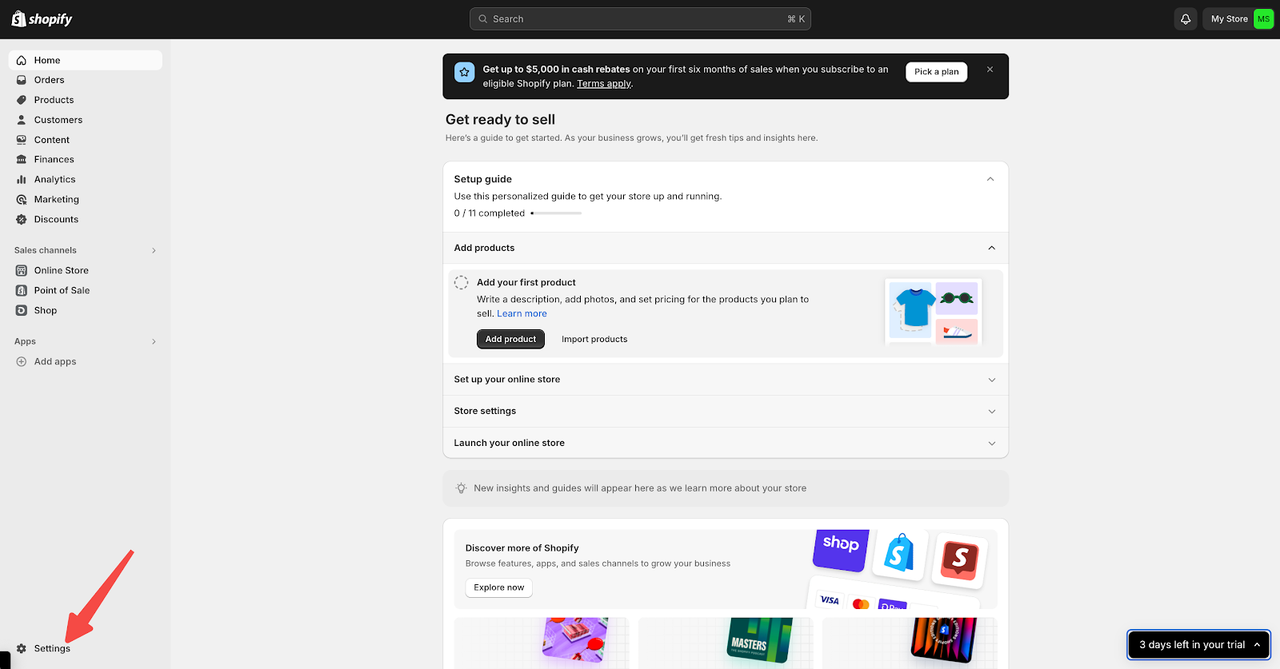
3. In the developer dashboard, click Create app.
4. Choose Start from Dev Dashboard. Name your app anything you like, such as "Shoplazza Migration," then click Create.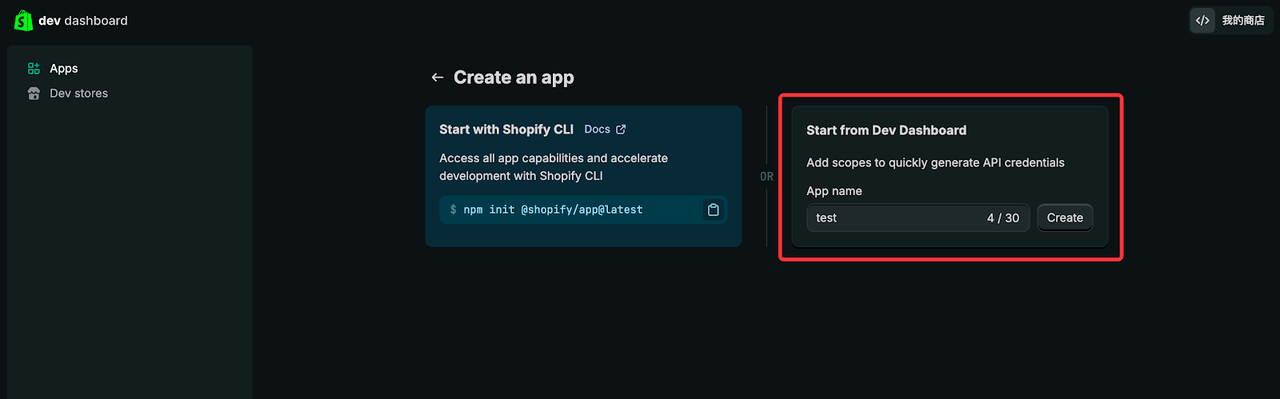
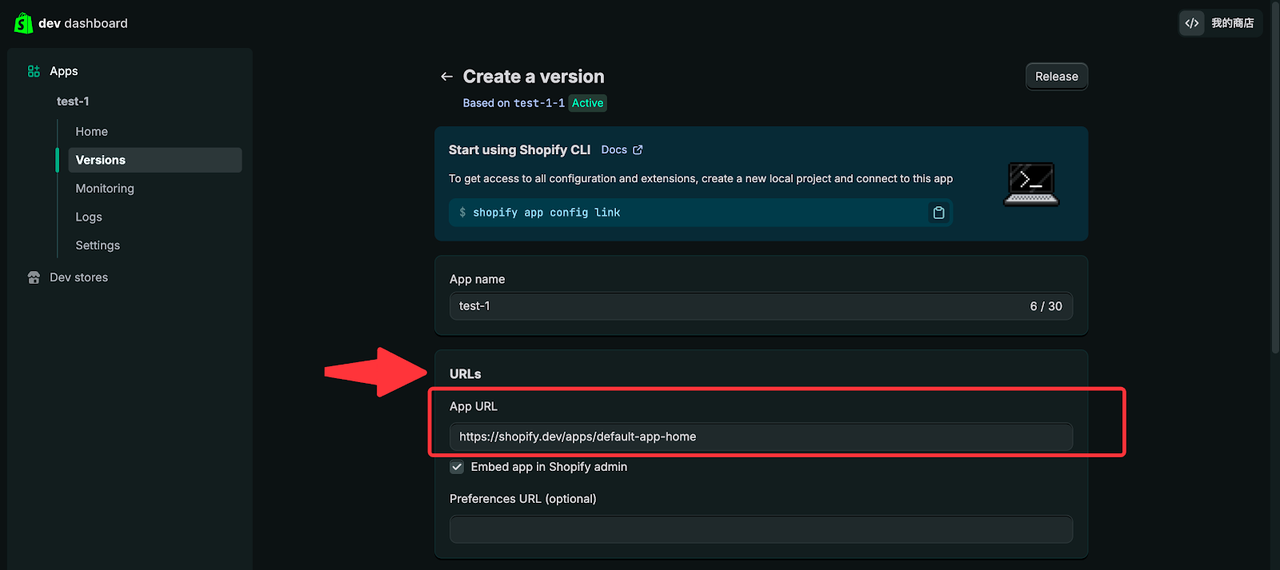
5. On the app setup page, fill in https://shopify.dev/apps/default-app-home as the App URL.
Set your API scopes
This step matters a lot. Missing permissions here can cause parts of your migration to fail.
- On the app setup page, find the Access section, then click Select scopes.
- Check the permissions for the data you want to move. Supported types are products, blog content, customers, orders, and discount codes.
- To keep things smooth, check all read and write permissions under Admin API and Customer Account API, except Payments.
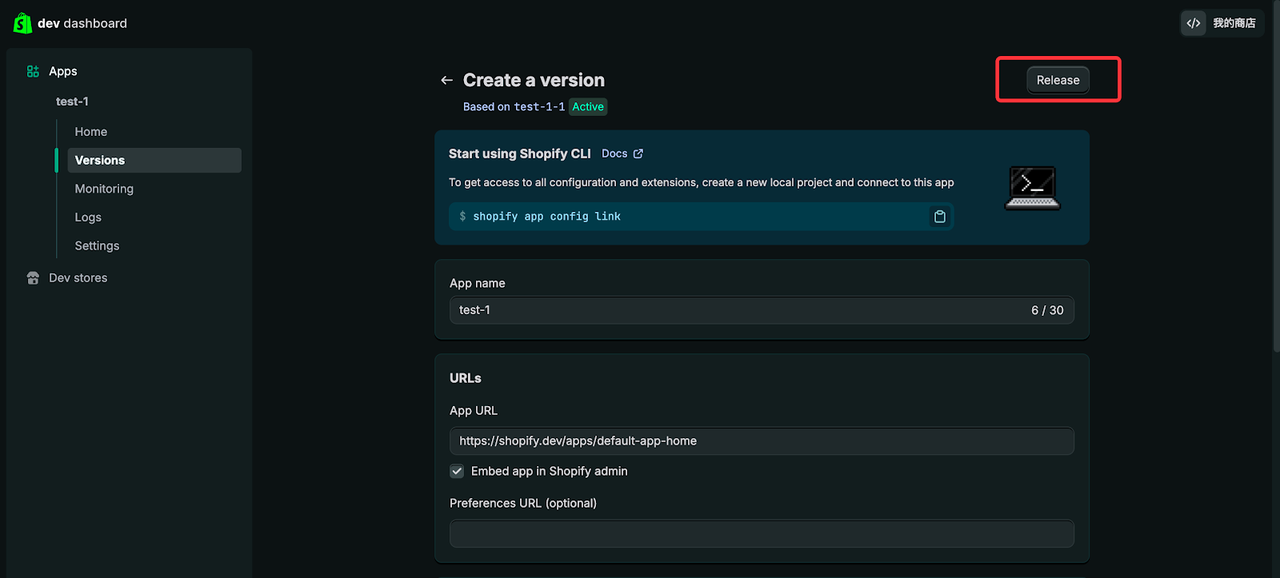
- Once your scopes are set, click Release.
Install the app and get your credentials
- After releasing your app, click App-Home in the left menu.
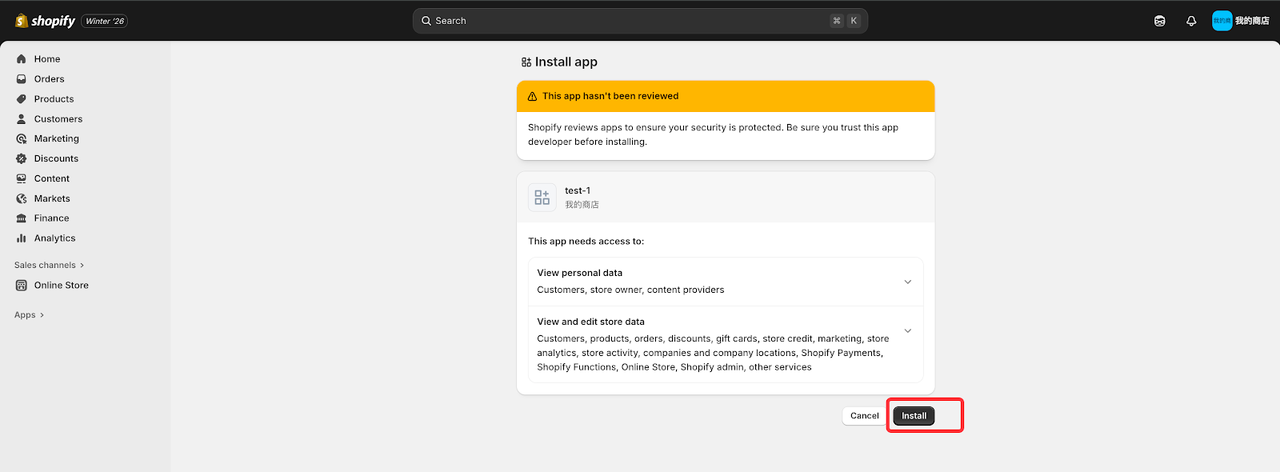
- Click Install app in the top right. Pick the store you want to migrate, then click Install.
- Once installed, go back to the app settings page and click Settings.
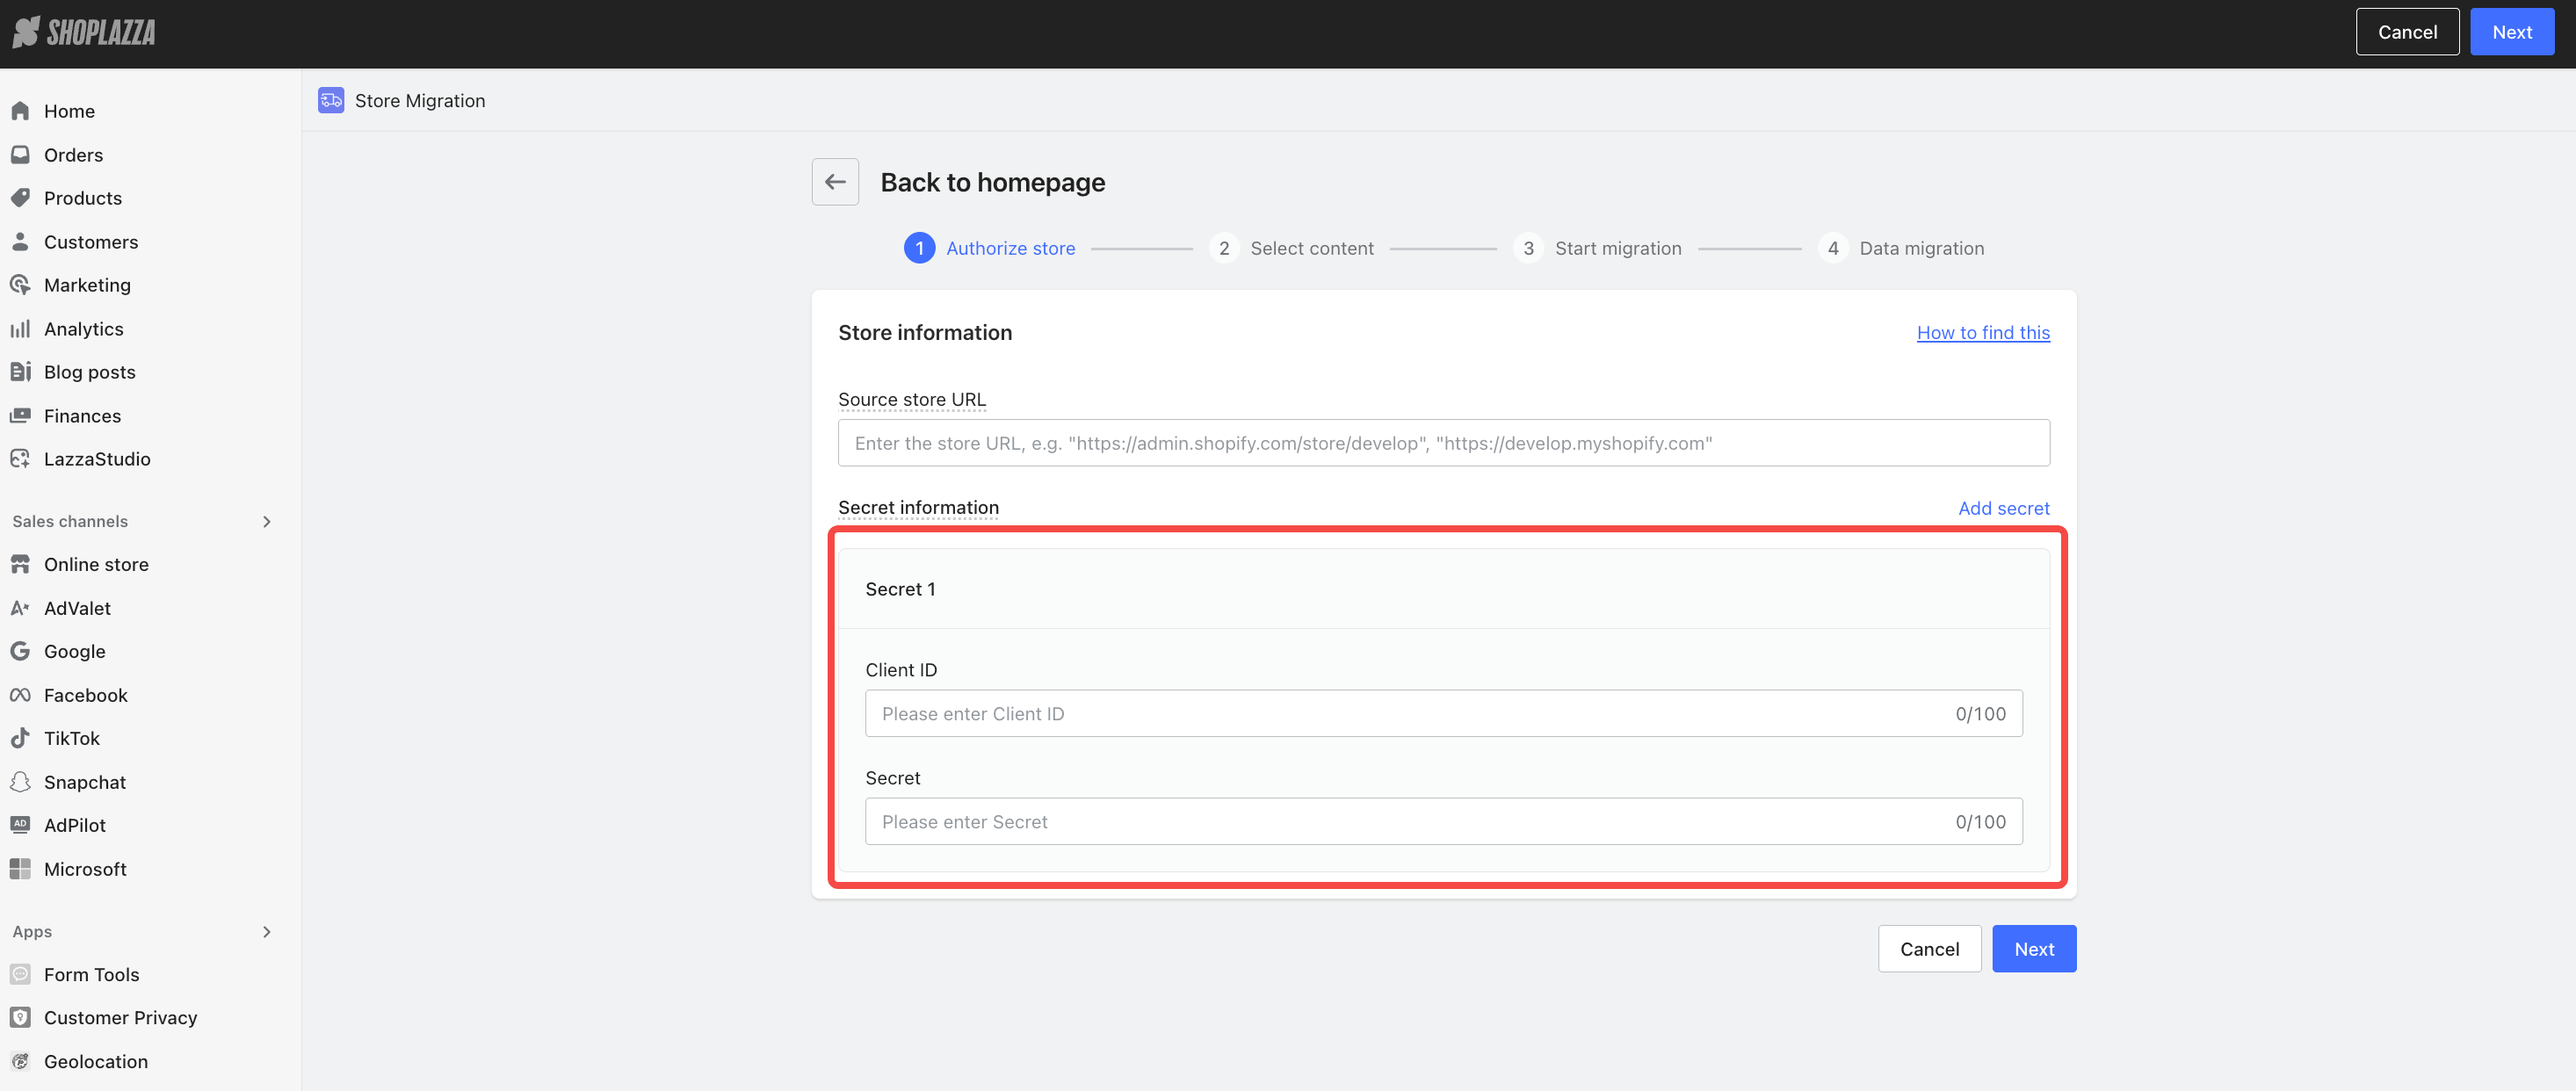
- Copy your Client ID and Client Secret, then paste them into Shoplazza's migration plugin.
Step 3: Run the migration
Once steps one and two are done, go back to your Shoplazza admin and open the migration plugin. You already entered your store URL in step one. Now enter your Client ID and Client Secret to finish authorization.
Click next to reach the module selection screen. Check the data types you want to migrate, such as products, customers, orders, blog content, and discount codes. Once you confirm your selection, click Start migration to begin.
You'll see live progress for each data type. Large stores don't need constant monitoring. The migration runs in the background, so you can leave the page and come back later. If you need to stop it, click Cancel migration. Anything already migrated stays put, and only the unfinished part is paused. Once it's done, you can check each section for the results.
What should you check after migration, before going live?
Finishing the one-click migration doesn't mean you're ready to launch. Run through this checklist to make sure your store switches over cleanly.
Check your product data
Spot-check your product count against Shopify. Check that product images are complete and variant images match correctly. Verify prices, SKUs, and stock counts. Confirm your product categories (smart or manual collections) and sort order look right.
Set up your domain without hurting your SEO
Domain migration is the step that affects your search rankings the most. Follow these steps carefully:
- Add your domain: In your Shoplazza admin, go to Settings, then Domains, and add your custom domain.
- Update your DNS records: Follow Shoplazza's DNS resolution guide to update your A record and CNAME record at your domain registrar, pointing your domain to Shoplazza's servers.
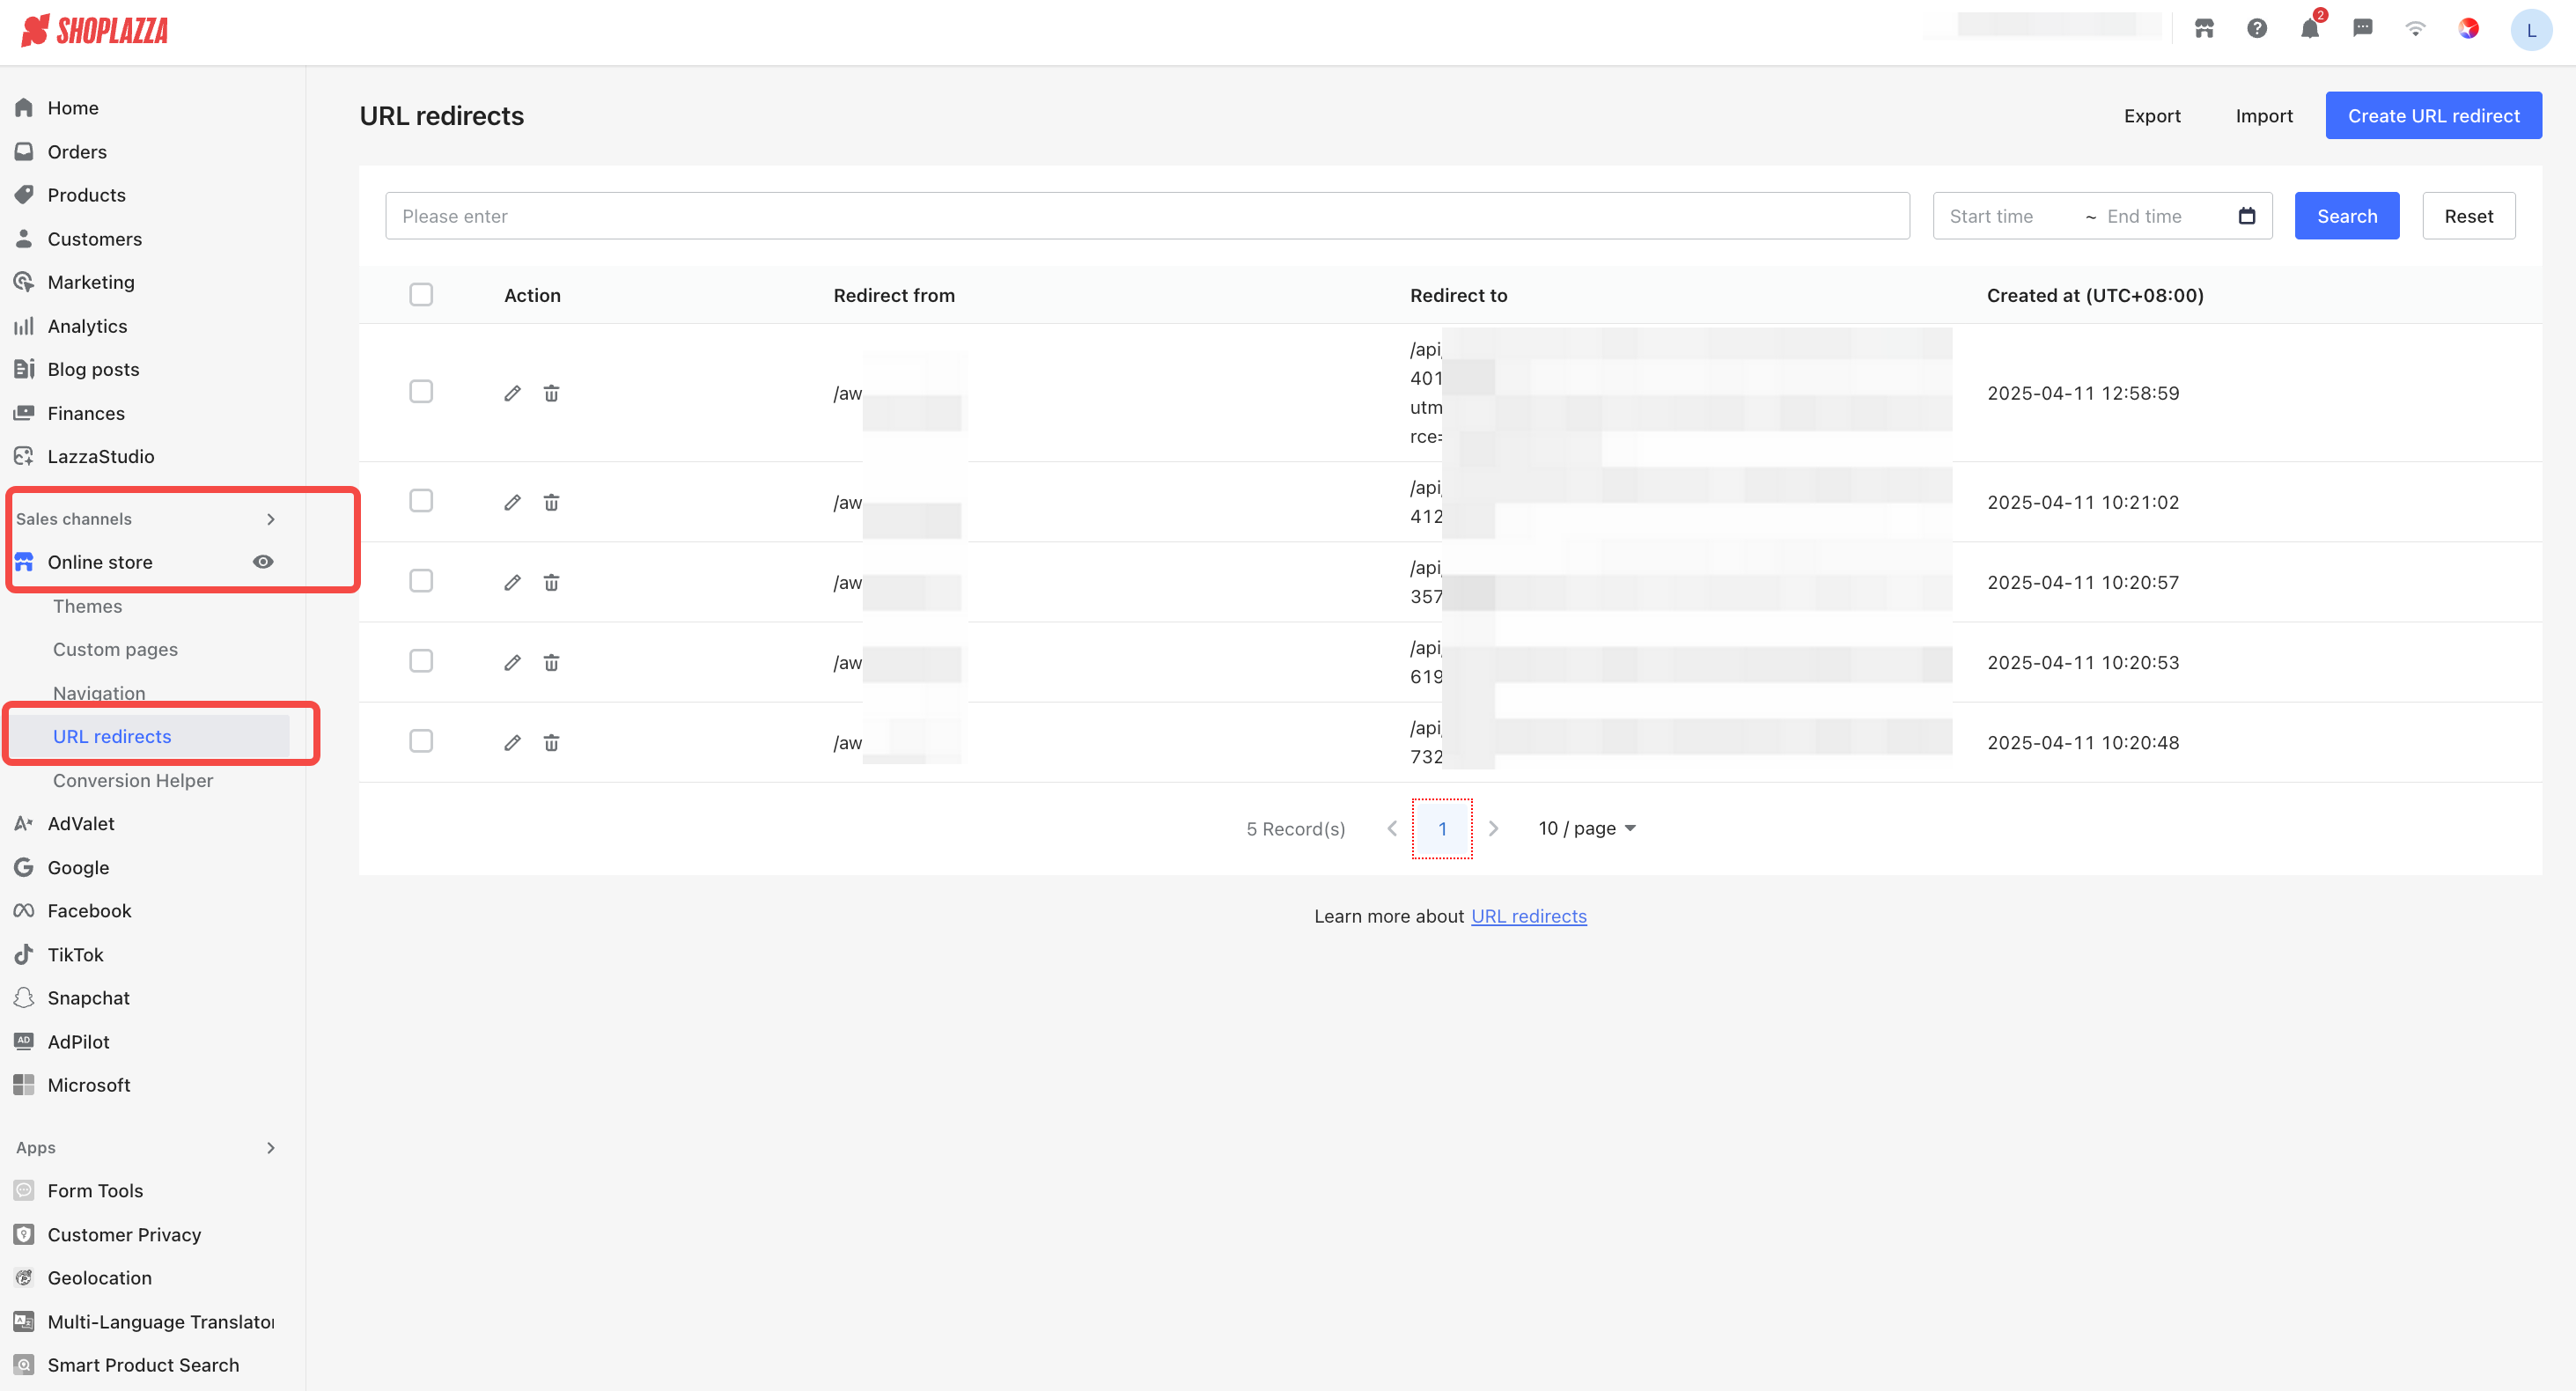
- Set up 301 redirects: To keep your old page rankings, set up 301 redirect rules in Shoplazza that point your old Shopify URLs to your new URLs. A 301 redirect tells search engines and browsers that a page has permanently moved.
Set up payments and shipping
Payment and shipping setup looks different depending on your product type.
For common categories like apparel, home goods, and electronics, Shoplazza payment option covers most needs. It's PCI DSS v4 certified, so transactions and data stay encrypted. It has a smart retry feature that can raise successful payments by around 17% when a failed charge is retried. It also uses AI fraud detection to flag unusual transactions early and lower chargeback risk. Payouts can be as fast as two business days.
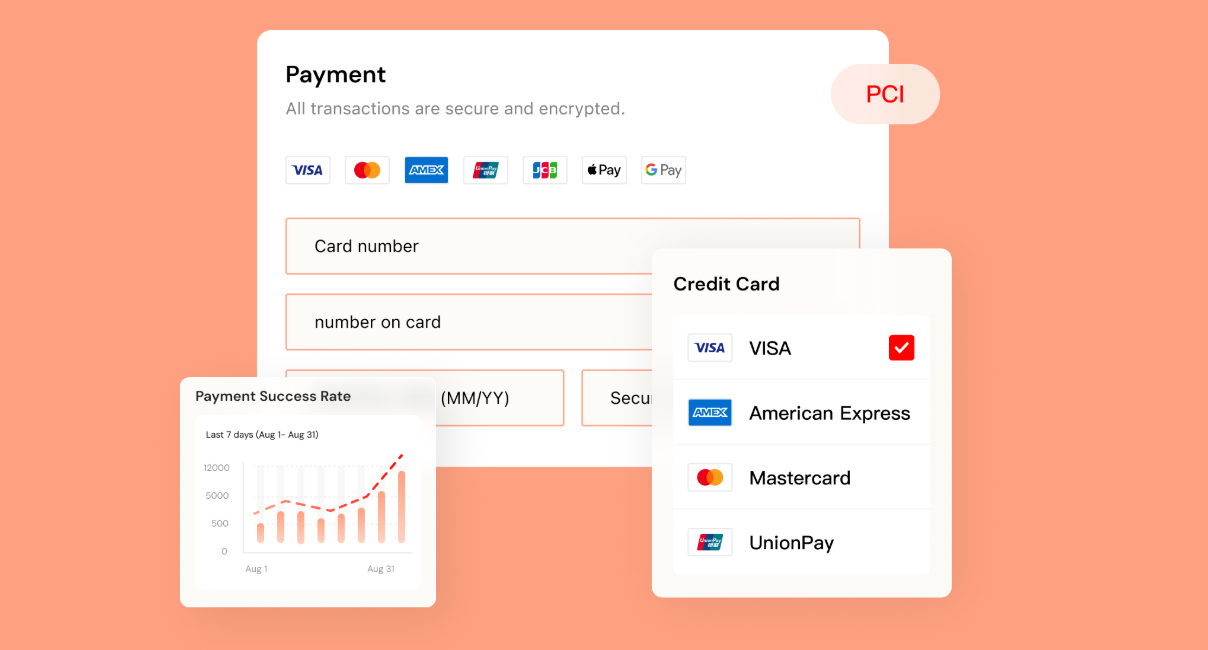
Besides its built-in payment option, Shoplazza also supports third-party payment options like PayPal, Stripe, Google Pay, and Apple Pay. You can mix and match based on what your target market prefers. For shipping, set your shipping rules and warehouse info in your Shoplazza admin. Set your tax rates for your target markets too. Once everything's set, run a test order to confirm checkout works end to end.
If you sell a higher-risk product like vape products, setup gets more complex. Mainstream processors like Stripe and PayPal generally don't support vape products. This is actually one of the top reasons sellers get their Shopify store shut down and start looking to migrate. For these categories, it's worth working with a payment provider that supports your product type. Shoplazza currently connects with Useepay, Authorize.net, and Wintopay, covering standard card payments through Visa and Mastercard, plus Apple Pay and Google Pay.
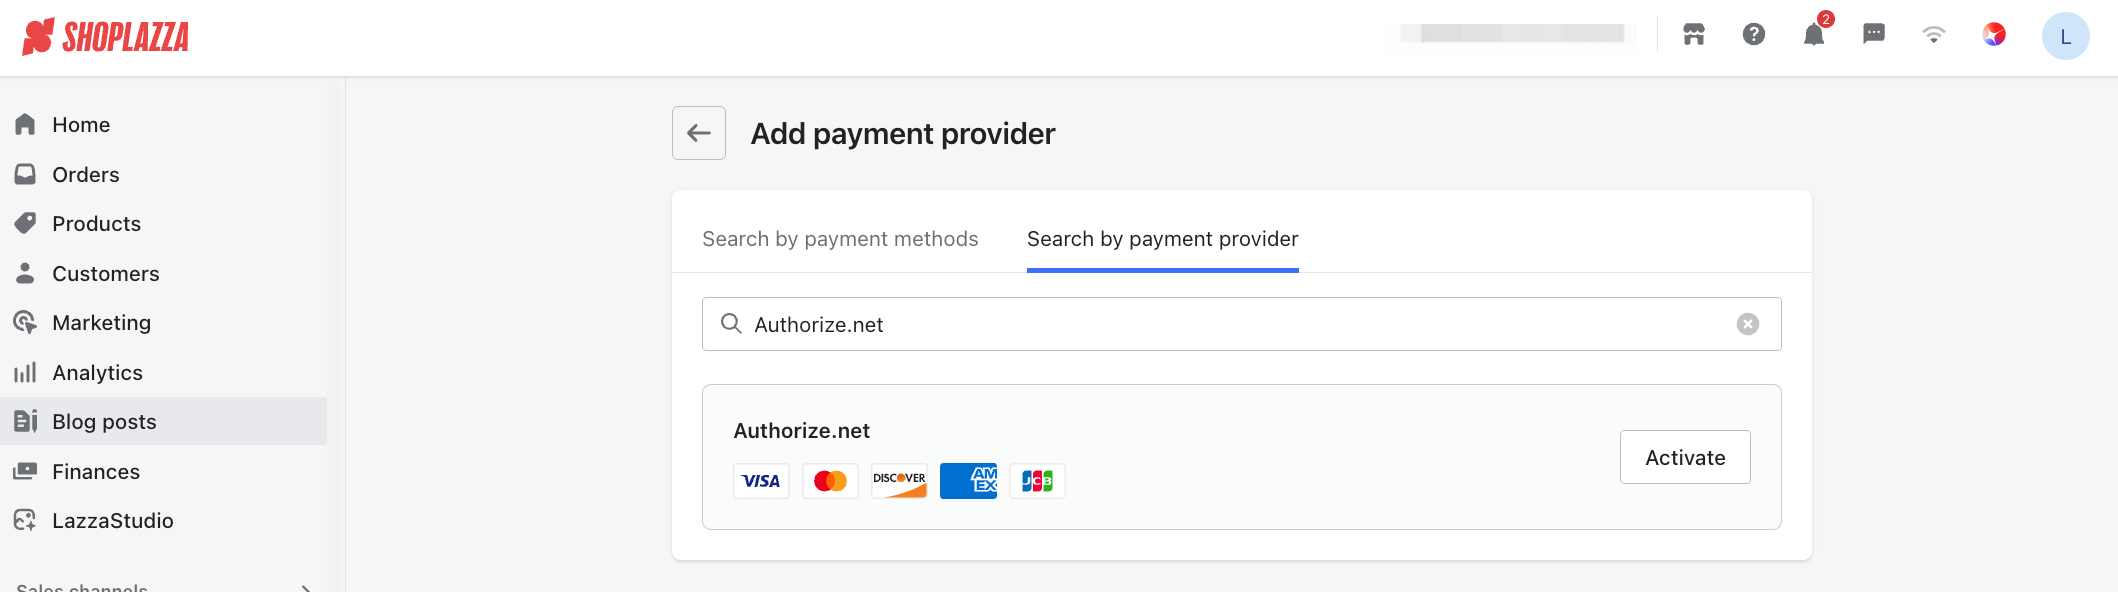
For example, to connect Authorize.net, search for it in your Shoplazza payment settings, enter your API Login ID and Transaction Key, then choose which card types to support.
Keep in mind that all three providers still require you to apply for your own merchant account through their acquiring bank. Approval requirements vary by region, so it's worth checking with your Shoplazza account manager before migrating to confirm your target market can get approved.
Test your store design and core flows
To move faster, you can use Shoplazza's AI store builder once your data is connected. Paste in the links to your migrated product pages, and the AI pulls in your titles, images, and prices. Based on your product category, it also generates matching store copy and visuals. The whole process takes about five to ten minutes. You'll get three different store designs to pick from. Once you choose one, the full store gets built automatically, with navigation and checkout already set up.
After that, go back to your admin and select which products to publish live. Once everything checks out, you can launch right away. It's a lot faster than picking a theme from scratch and building each page by hand.
Once your store's live, check how it looks on both mobile and desktop. Test your cart, checkout, and sign-up flows to make sure they run smoothly. Set up your order confirmation and shipping notification emails too.
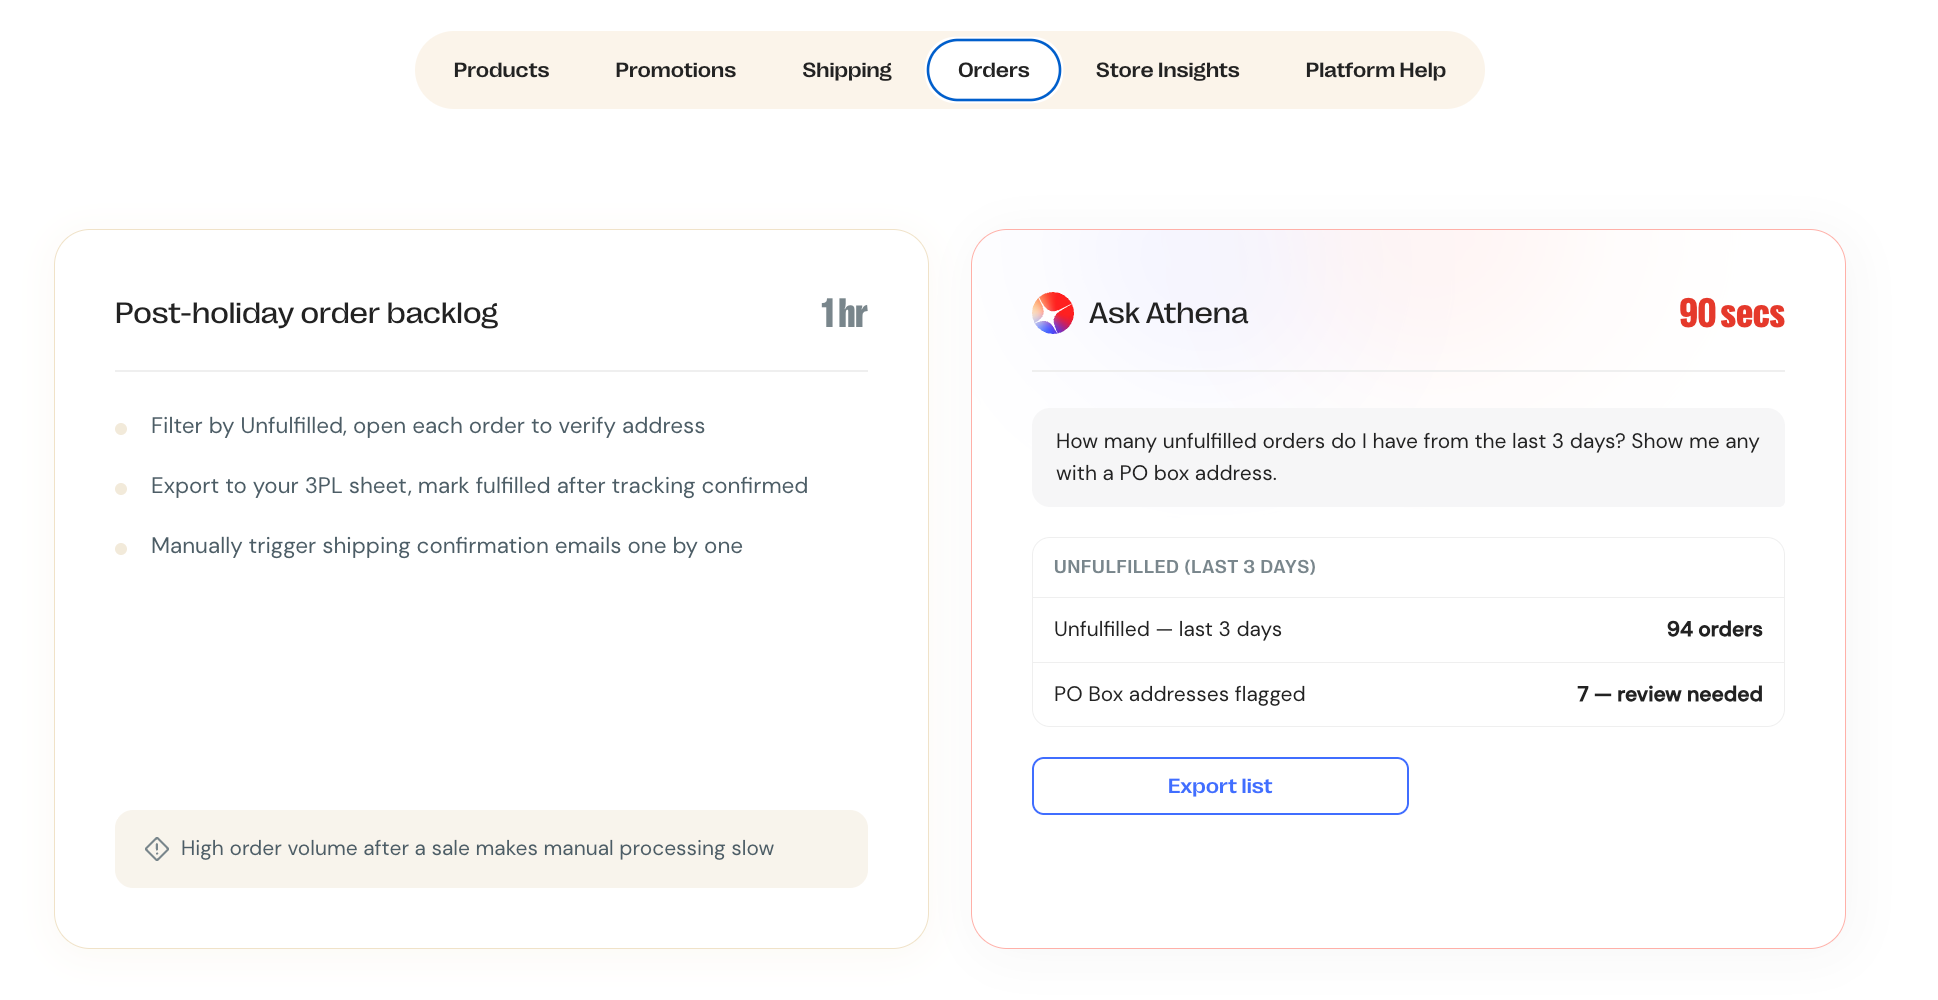
Day-to-day store tasks, like pricing updates, promotions, and checking your numbers, don't have to fall entirely on you either. Shoplazza's built-in AI store assistant Athena can handle a lot of this through plain language requests, like "raise prices 10% for this category." For anything that changes or deletes data, it shows you a preview first, so nothing runs without your okay.
Bring over customer accounts and loyalty perks
Once your data's moved and your store's set up, there's one more thing worth checking: can your old customers log back in, and do they still have their points?
If your store already has a loyalty program, you can bring over member data and point balances using Shoplazza's Loyalty & Push tool. It also supports importing data from popular Shopify loyalty apps, so you don't have to rebuild your loyalty program from scratch.
For customers who were imported but haven't come back yet, Shoplazza also supports automated win-back flows. These use rewards and login prompts to bring customers back for their first visit on the new store, reducing the chance you lose them just because you switched platforms.
After migration, Shoplazza also offers two features that cut down on manual loyalty setup:
- Customers who check out with an email automatically become members. No separate sign-up step needed, and new members get welcome points to use on their next order.
- Sellers can bundle discounts, like percentage-off, dollar-off, and free shipping coupons, into paid coupon packs. Once a customer buys one, the coupons land straight in their account, and checkout automatically shows which ones apply to their order.
Together, these turn rebuilding a loyalty program after migration from manual work into something the platform mostly handles on its own.
One thing to flag: customer passwords can't be transferred by any migration tool, due to how they're encrypted. This has nothing to do with your plan tier. It's a limit built into Shopify's system. After migrating, customers will need to reset their password once. It's worth telling them ahead of time through email or a store notice, so they don't think something's wrong with their account.
Why are more sellers choosing Shoplazza over Shopify?
Once you migrate, you get access to a few upgrades that Shoplazza has been building out.
An AI-native ecommerce operating system
Shoplazza has folded store building, image generation, product management, and order handling into a single AI agent. This is the core of Shoplazza's 2026 AI-native ecommerce setup. Instead of learning where each tool lives in the backend, you describe what you need in plain language, like "build a women's clothing store for the US market," or "set 20% off all dresses for Black Friday, starting November 28." The AI agent finds the right tool, shows you a preview, and runs it once you confirm.
This covers one-click store setup, product and marketing image generation, product uploads and bulk edits, discount setup, shipping template setup, bulk order processing, and checking things like conversion rate changes. It also connects with major platforms like PayPal, Meta, and Google. Based on Shoplazza's own published comparisons, tasks that used to take three to seven days, like building a store, setting shipping rates, or bulk processing orders, often take a few minutes to half an hour with this AI agent. Anything involving creating, editing, or deleting data shows a preview first, so nothing runs automatically without your okay.
Support built for sellers going global
- Dual servers across regions, so store load times average under two seconds
- Payment coverage for 180+ methods worldwide, with fast local payouts and support for regional payment methods
- Shipping connections with 50+ international carriers, plus a new fulfillment service added in 2026
Pricing that's easier on your margins
Compared to Shopify's subscription fees, transaction fees, and app costs, Shoplazza's pricing tends to work out lower overall. Plans start at $22.4 a month and include more built-in features and integrations, which works whether you're just starting out or already running an established brand.
Built-in SEO and marketing tools
Shoplazza supports URL rewrites, custom meta tags, and structured data as core SEO features. It also includes intelligent product recommendations (which can lift conversion rates significantly), one-click social pixel setup, email marketing, and a coupon system, all aimed at lowering acquisition costs and increasing repeat purchases.
Move your store with confidence
Migrating from Shopify to Shoplazza comes down to three steps: install the migration plugin, connect your Shopify Developer App, then pick your modules and run the migration. No code needed, and smaller stores often finish the core data transfer within an hour. The harder part comes after: redirects, payment and shipping setup, and getting your design right. Working through this guide's checklist step by step makes for a smoother, lower-risk switch. If you're considering migrating, try registering a Shoplazza account first, then run a full test migration before switching your live domain.
Frequently asked questions about migrating Shopify to Shoplazza
Q: How do I migrate my online store to a new platform?
At a high level, you install a migration plugin on your new platform, connect your old store's account through an authorized app, choose which data to bring over (products, customers, orders, blog content), and run the transfer. Most platforms, including Shoplazza, handle this without any coding. The bigger work usually comes after the data moves, like setting up redirects and testing checkout.
Q: Will migrating affect how my Shopify store runs during the process?
No. Migration only reads your data. It doesn't change or delete anything on the Shopify side. Your Shopify store can keep running normally until your new store is fully tested and ready to launch. It's worth switching your domain only after you've confirmed everything works on the new store.
Q: What kinds of products are a good fit for moving to Shoplazza?
Products that work well for building brand loyalty tend to be a good fit, things like apparel, beauty, home goods, electronics accessories, and pet supplies. Higher-ticket items that need detailed photos or videos also work well, since template-based pages on third-party marketplaces often can't show off these products fully. Dropshipping and made-to-order products fit too, since Shoplazza's backend includes built-in sourcing and fulfillment tools.
Q: What kinds of sellers should consider migrating from Shopify?
Sellers who've already built sales on marketplaces like Amazon or TikTok Shop, and want more control over their own customer data, are a common fit. So are sellers running paid ads on Facebook, TikTok, or Instagram who want a store that converts that traffic well. Both bulk sourcing sellers and brand-focused sellers can work with Shoplazza, so it's less about your business stage and more about wanting more ownership over your storefront.
Q: Will my customers keep their accounts and loyalty points after I migrate?
Yes, in most cases. Shoplazza's Loyalty & Push tool can import your existing member data and point balances, including data from popular Shopify loyalty apps. The one exception is passwords, which can't be transferred due to encryption. Customers will need to reset their password once after migrating, so it helps to give them a heads up beforehand. For a full walkthrough of the migration checklist and account transfer process, see Shoplazza's store migration service page.
